January 21, 2026
Teachers carry more in one day than most people realize. That’s why the idea of adding yet another tool into the mix can feel like someone handing you a kettlebell when you’re already juggling flaming torches. So let’s take a breath. Because this is not one more thing. Creating a custom AI assistant (also known as a GPT, a custom chatbot, or a gem, as Google likes to call them) is a strategic way to make the tools you already use work for you.
Think of a GPT as a laminator for your brain. (And what teacher doesn’t LOVE laminating?)
Set it up once… and boom. Your routines, your scaffolds, your tone, your go-to moves? Permanently preserved. Suddenly you’re not reinventing the wheel every time you plan a lesson, write directions, or differentiate a text. You’re starting at 30 percent instead of zero, and that changes everything.
Because every teacher has said at some point:
“I wish I had another me.”
Custom chatbots become that “other you,” except they’re the laminated version. They’re always patient, always awake, always ready, and always holding your values and context exactly the way you set them.
To learn more about what the heck a GPT is, check out this previous blog.
If you’ve never built one of these custom tools before, don’t worry. You do not need to be a coder, an engineer, or someone who uses words like “fine-tune a model” at parties.
This post will walk you step by step through:
- Examples of teaching moves that make good first AI assistants
- How to build a custom Gem in Google Gemini (FREE)
- How to build a custom GPT in ChatGPT for Teachers (FREE through 2027)
- How to think through the assistant you actually need
- How to personalize assistants so they hold your context, tone, and values
- What kinds of resources you might want them to remember
- What it actually looks like to use them in your day-to-day teaching
By the end, you won’t just understand how to build your own tools. You’ll feel the shift that comes from designing digital teaching assistants that support inclusion, creativity, and student-centered learning alongside you.
Let’s build your first ones together.
What Teachers Can Build: Examples to Spark Possibility
These are the kinds of teaching moves you might want to “laminate” so you don’t have to recreate them every time. You can build any of these using the steps later in this guide.
- Warm-Up Wizard – Quick bell ringers tied to your unit and your students
- Differentiation Buddy – Scaffolds and rewrites for multilingual learners
- Lesson Kickstart Assistant – Rough lesson outlines you refine
- Inclusion Coach – Equity-focused revisions and access checks
- Feedback Translator – Student-friendly feedback from rubrics
- Project Builder – Student-centered projects with checkpoints
- Parent Email Organizer – Calm, clear family communication
- Rubric Builder – Simple, skill-based rubrics
- PLC Partner – Support for data analysis and team conversations
- Student Portfolio Storyteller – Reflection prompts tied to identity and growth
- Thought Partner – Helps when your brain is oatmeal
You do not need all of these. Pick one to feel some relief.
The “Assistant You Wish You Had”
This is the prompt you give yourself before creating anything. Here is a template you can use to think through what kind of assistant you want to “laminate!”
Step 1: Say it out loud
“If I could clone myself, the clone would handle…”
Let the list spill out. Planning. Rewriting directions. Emailing parents. Differentiating texts. Organizing your ideas. Anything goes.
Step 2: Name the part of teaching you wish felt lighter
“The part of teaching I wish felt lighter is…”
This is usually:
- planning
- grading
- differentiating
- creating materials
- giving feedback
- prep for observations or PLCs
Step 3: Center students
“Students would benefit most if I had support with…”
This grounds your assistant in inclusion.
Step 4: Imagine the backstage helper
“If I had a backstage assistant no one could see, they would…”
This unlocks creativity.
Step 5: Identify friction points
“What slows me down is…”
Boom. That’s the assistant you build.
A quick permission slip before we build
Before we get into the steps, let’s name something important.
You cannot mess this up.
Nothing you build here is permanent. You can delete it. You can rename it. You can start over five minutes later with better clarity. This isn’t coding. It’s closer to drafting on a whiteboard and erasing as you go.
Think of this as play, not a commitment. Experimentation, not a contract.
The goal isn’t to build the perfect assistant on the first try. The goal is to build something that makes tomorrow a little lighter than today. You’ll refine it as you use it, just like any teaching move that gets better with reps.
Curiosity is enough to get started.
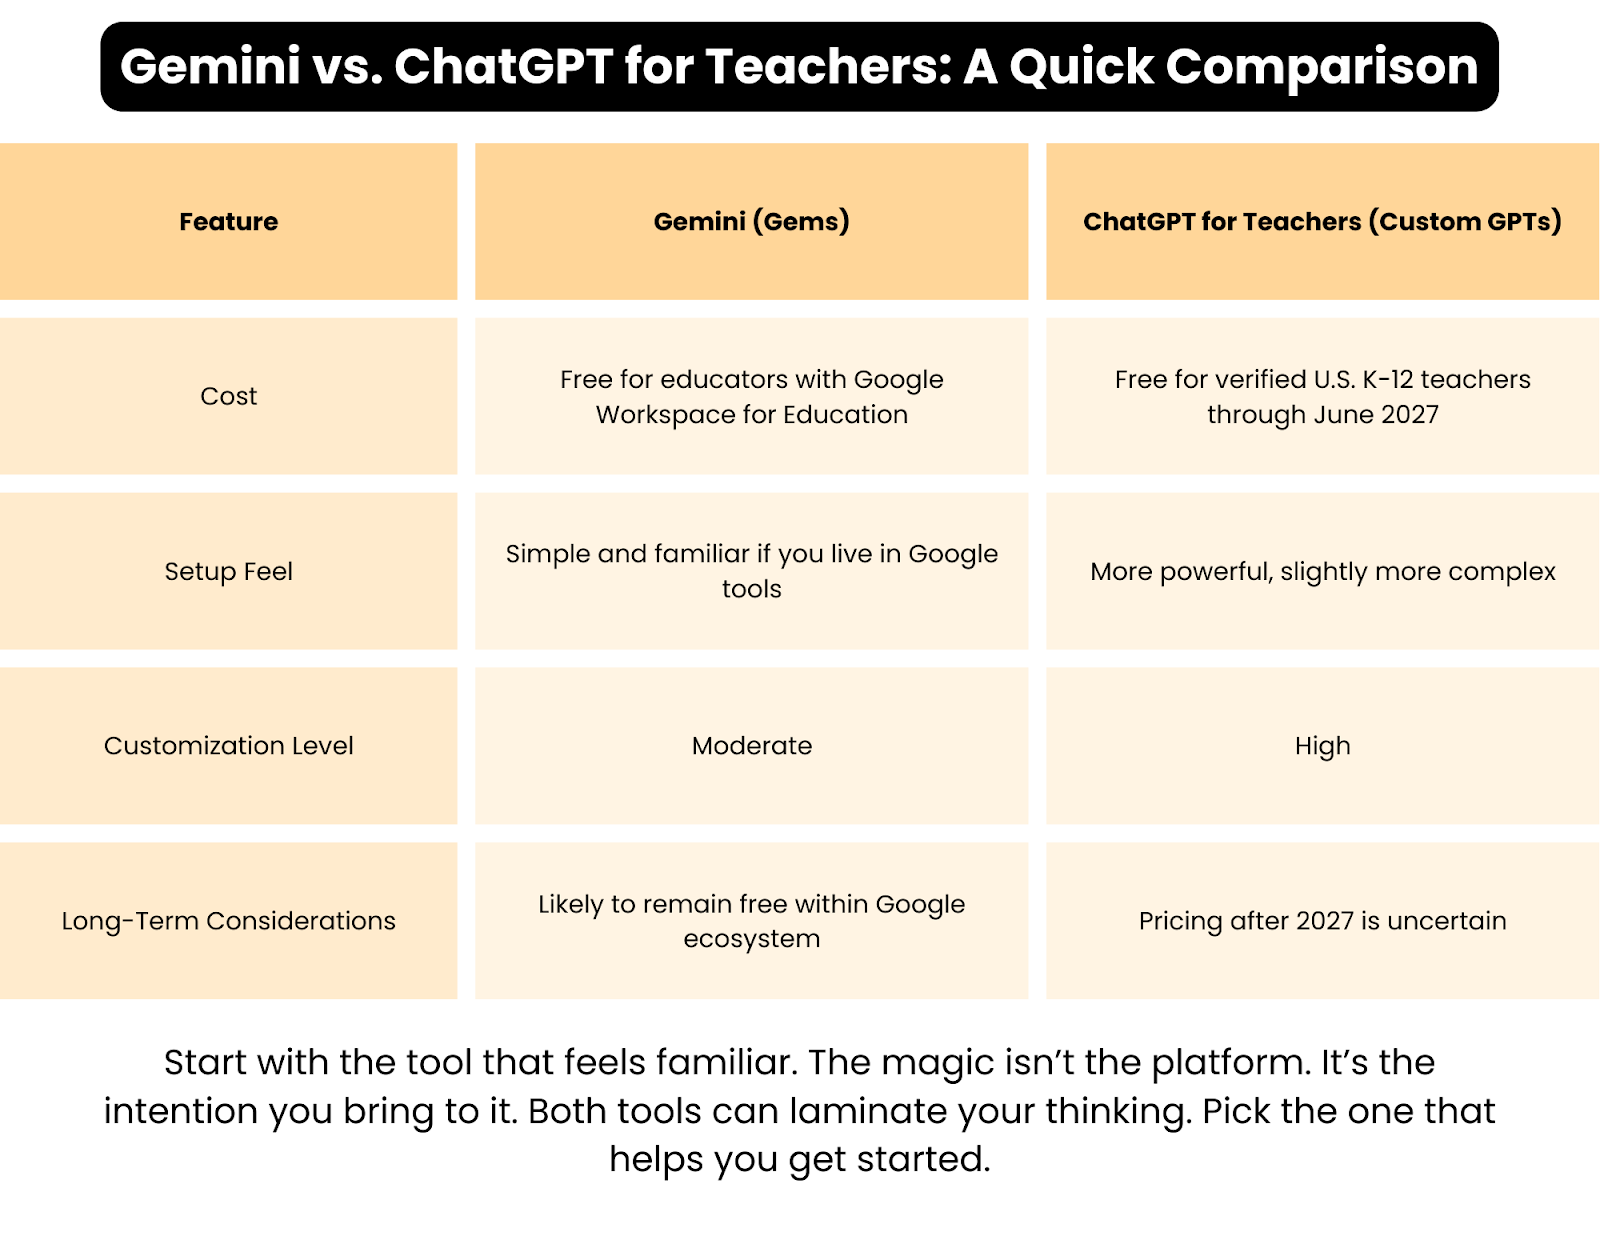
How to Build a Custom Gem in Google Gemini
- Go to gemini.google.com (free to all educators with a Google Workspace for Education account!)
- Click Create a Gem
- You’ll be asked to name it and describe its role
- Paste in your instructions (Pro tip: Use a chatbot to draft your instructions, too!)
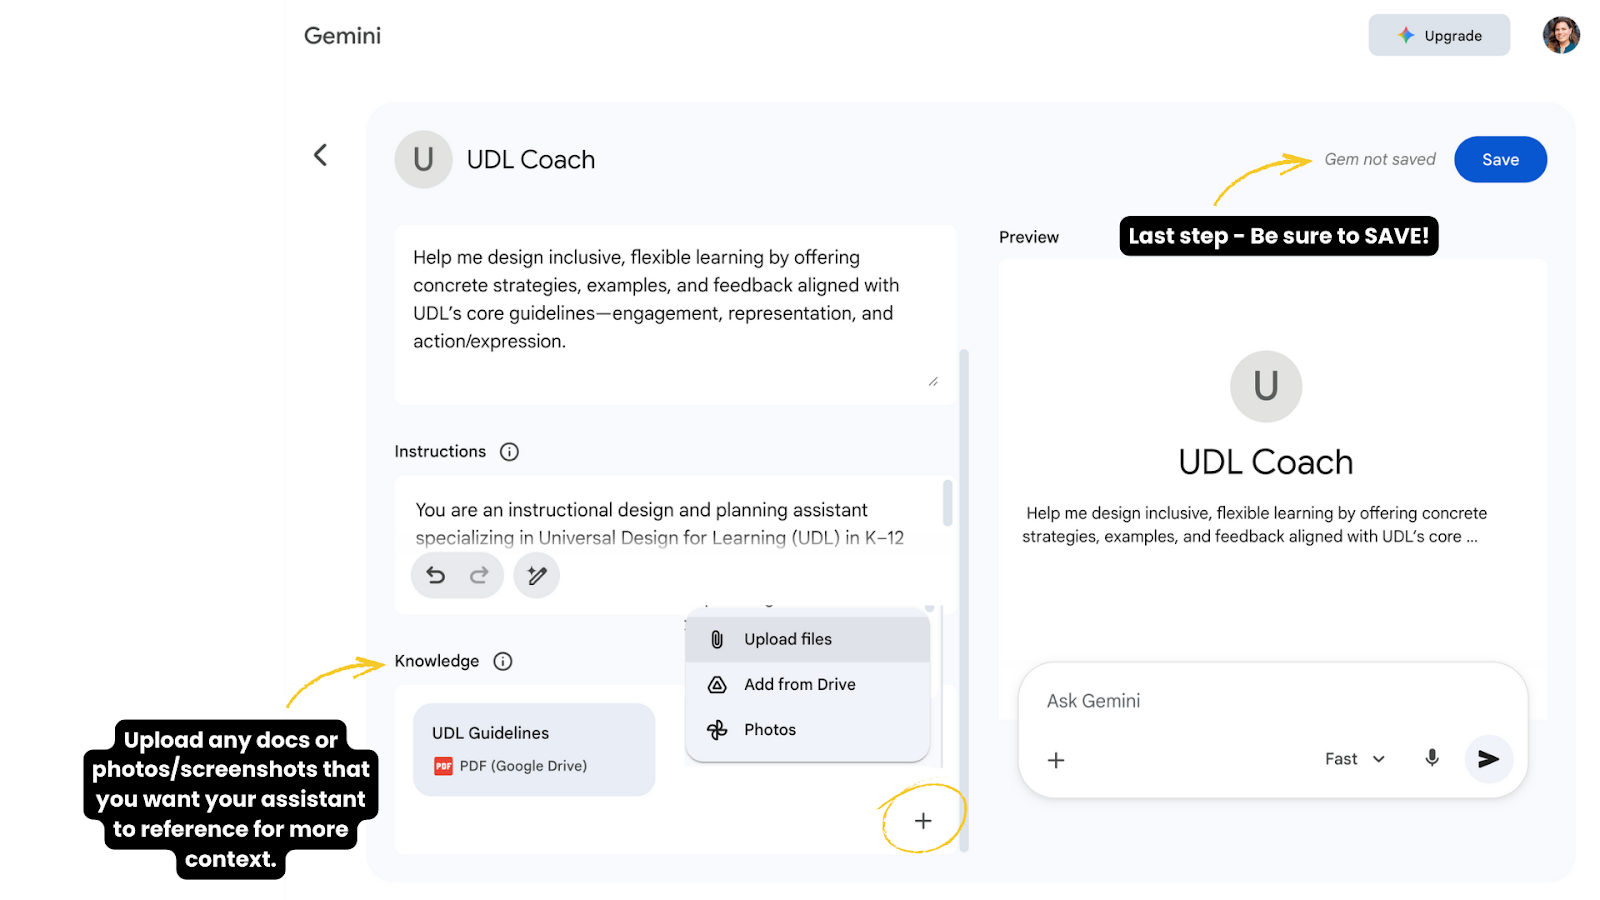
- Add any details you want it to remember – what you teach, how you want it to respond, etc…
- Upload resources under “knowledge.”
- Save
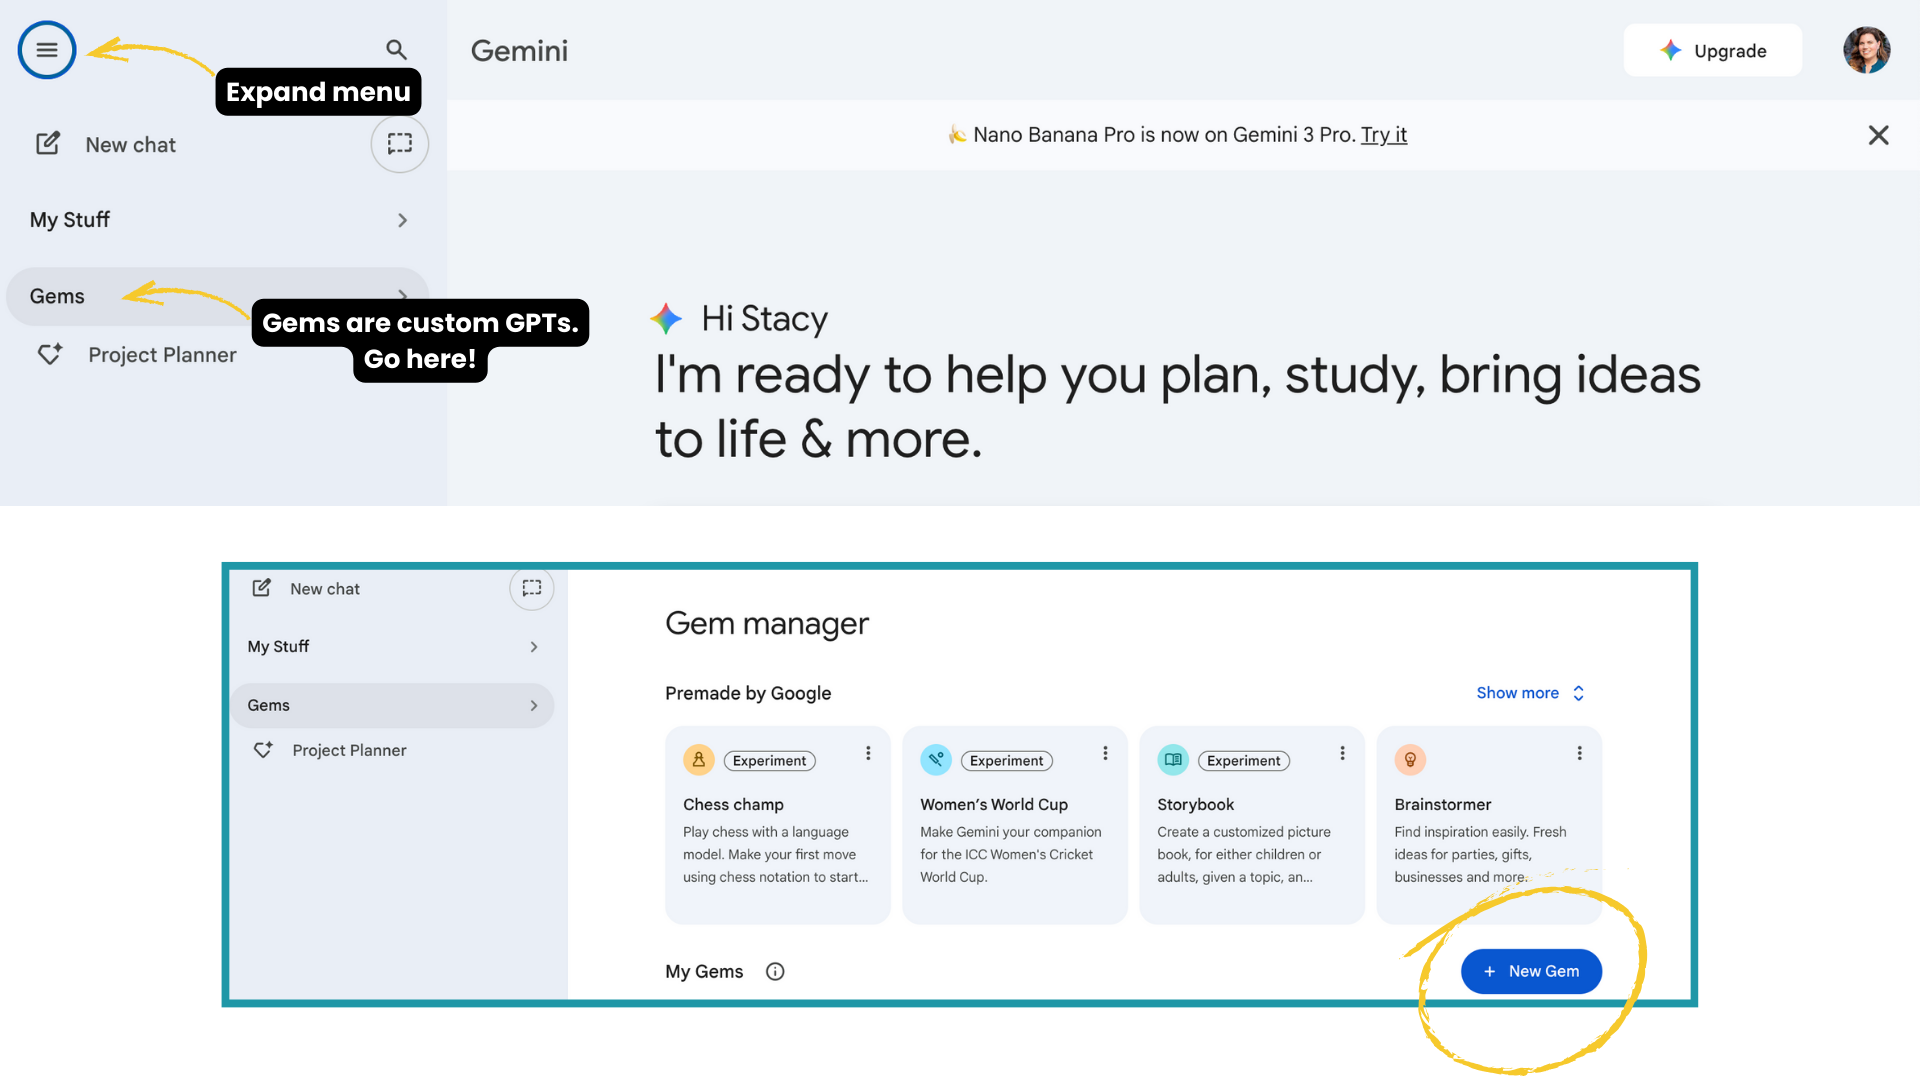

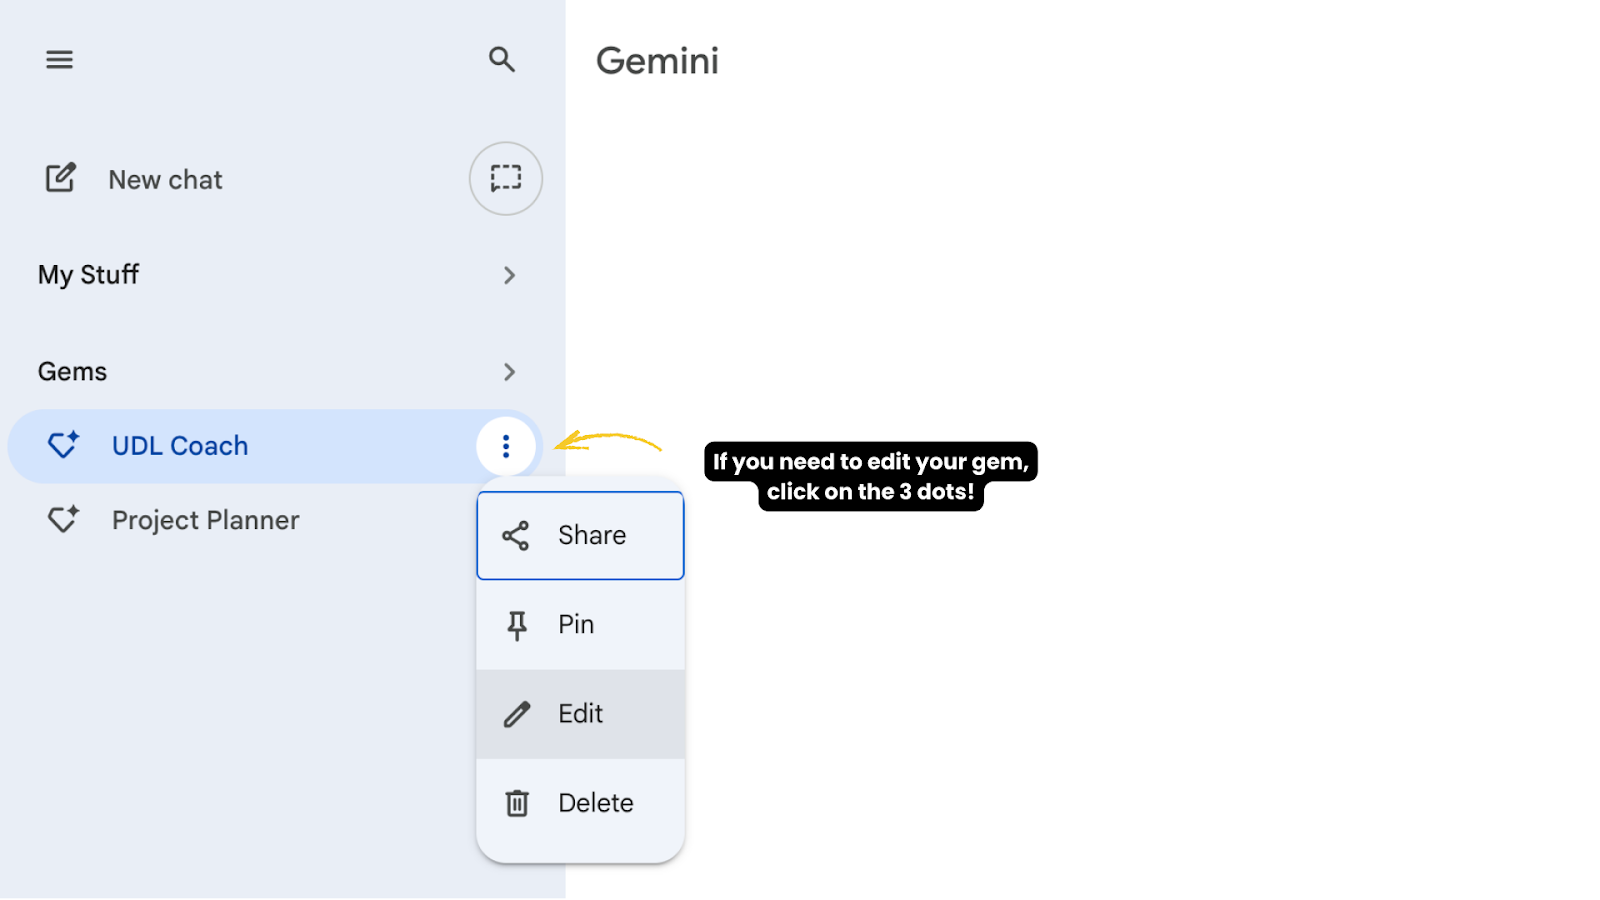
Gemini will now show your Gem anytime you need it. You can edit it and continue to refine as you use it.
How to Build a Custom GPT in ChatGPT for Teachers
OpenAI recently announced that ChatGPT for Teachers is free for verified? U.S. K-12 educators thru June 2027. Keep in mind, though, that you might not want to build a bunch of bots on this platform if AFTER June 2027 they are going to ask you to pay $20 a month or more… Note that the FREE version of ChatGPT does NOT currently allow for the creation of GPTs…
To get started, open ChatGPT ? Click Explore ? + Create

There are TWO ways to build your chatbot in ChatGPT… Create or Configure. Here’s what you need to know.
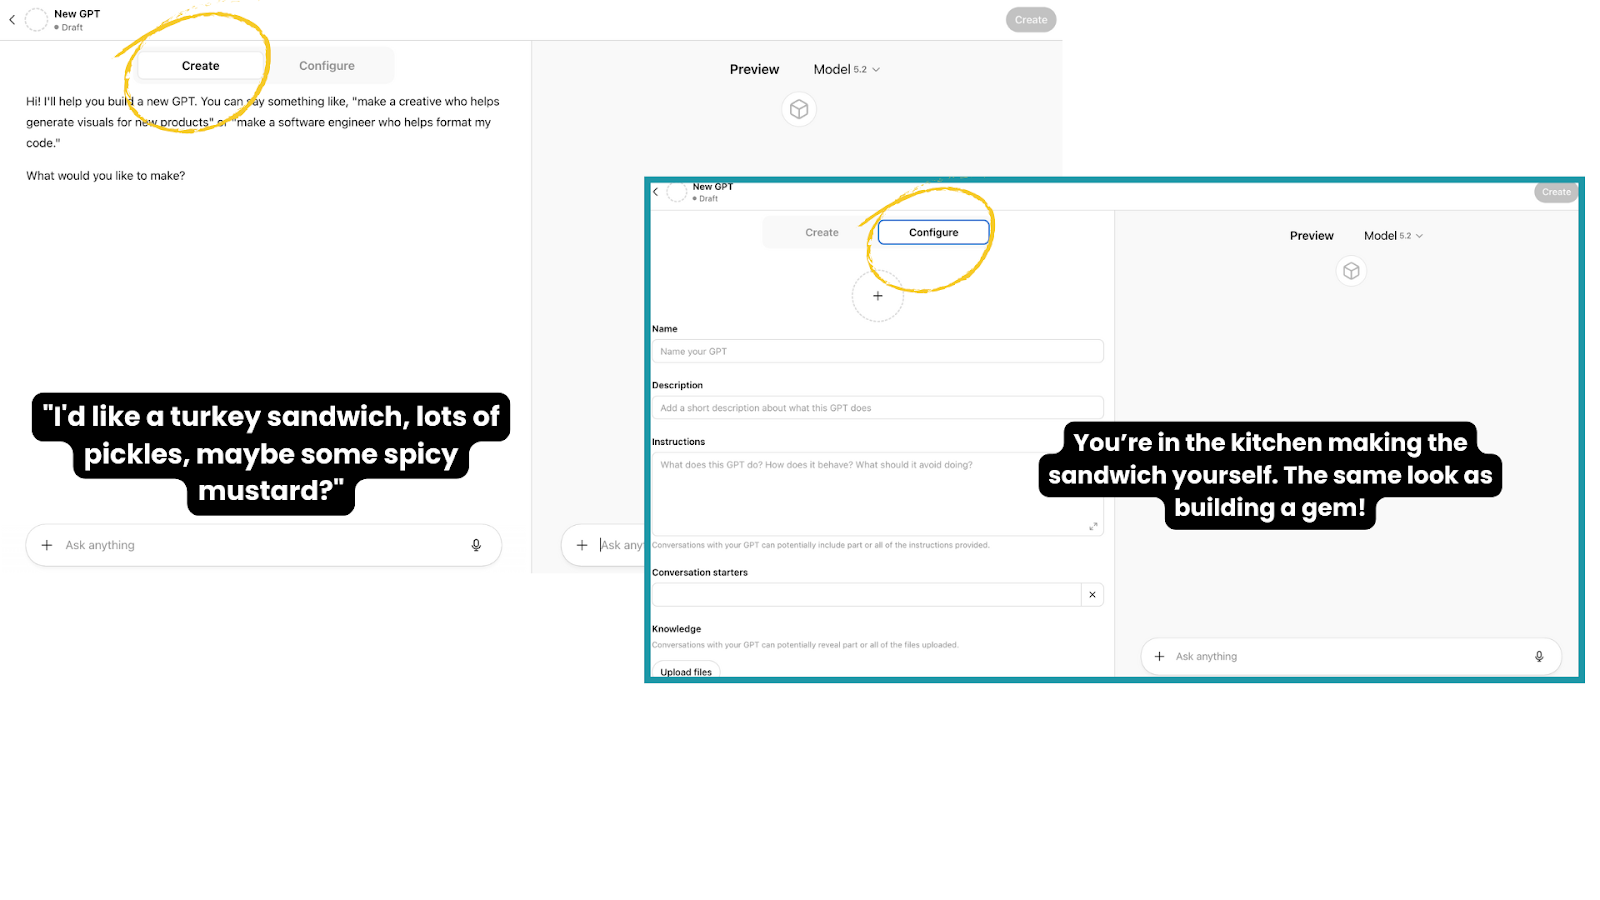
Think of the difference like Ordering a Sandwich vs. Making the Sandwich.
1. The CREATE Tab (The “Chat”)
- Analogy: You are at a deli counter telling the employee what you want. “I’d like a turkey sandwich, lots of pickles, maybe some spicy mustard?”
- What it does: You talk to the AI (The “Builder”). It asks you questions, you answer them, and it writes the code/instructions for you in the background.
- Pros: Very easy. Great for brainstorming ideas if you don’t know where to start.
- Cons: It is often imprecise. If you say, “Make it funny,” it might accidentally delete your previous instruction to “Use these specific vocabulary words.” It guesses at what you want.
2. The CONFIGURE Tab (The “Control Panel”)
- Analogy: You are back in the kitchen making the sandwich yourself. You have total control over exactly how many pickles go on the bread.
- What it does: This is a manual form with boxes for Name, Description, Instructions, and Knowledge.
- Pros: Exact control. You can copy/paste the precise system instructions you want and the AI will follow them exactly. It won’t “guess.”
- Cons: You have to know what you want (which you now do)
One Example to Get You Started with Instructions
If I had to pick one teaching move to “laminate,” this would be it.
Inclusion Coach
You are my Inclusion Coach. When I share lesson content, directions, or materials, help me identify possible barriers for students. Suggest 2–3 practical ways to increase access using UDL principles, including language supports, flexible ways to engage, and options for showing understanding. Keep suggestions realistic, respectful, and centered on student dignity. Ask clarifying questions when needed.
This works as a first assistant because it supports how you teach, not just what you teach. You can reuse it across lessons, subjects, and units, and refine it as you notice what your students need most.
Things you might upload to the Knowledge:
Curriculum Documents
- State/National Standards (PDF): The official Common Core, TEKS, or NGSS standards for your specific grade level.
- Pacing Guides: The school’s timeline of what topics must be covered by which month.
- Textbook Chapters: PDFs of the specific reading material used in class (so the AI doesn’t hallucinate content).
- Vocabulary Lists: Excel or CSV files (or even screenshots!) of the exact words students are expected to know for the year.
Classroom Policy & Context
- The Syllabus: The document outlining late work policies, grading weights, and classroom rules.
- Student Interest Cheat Sheet: A simple text file listing current trends the class loves (e.g., specific video games, sports teams, memes, local news) to help the AI make relevant analogies. Remove student names and any personally identifying info ahead of time, though!
- Tone Guide: A sample of your own writing that is “warm and encouraging” or “strict and academic,” so the AI mimics your voice.
Assessment Tools
- Past Quizzes & Tests: Uploading previous years’ exams helps the AI understand the difficulty level and question style you prefer.
- Rubric Templates: Standard department rubrics (e.g., “The 10th Grade Narrative Writing Rubric”) so the AI grades or creates content aligned with your department.
- Question Banks: Lists of depth-of-knowledge (DOK) question stems.
How to Actually Use Your Assistant (Once It’s Built)
Once your GPT or Gem is created, you don’t need to do anything fancy. You just… use it.
Open it the same way you’d open a document you return to again and again. Then talk to it like a backstage teaching partner who already knows your context.
Here’s what that might look like in real life:
- Paste in a set of lesson directions and ask, “What might be confusing or inaccessible for students?”
- Drop in a slide deck or worksheet draft and say, “Help me reduce cognitive load without watering this down.”
- Share a task and ask, “Where might multilingual learners get stuck, and how could I support them?”
- Type, “I’m short on time. What’s one small change that would make this more inclusive?”
You don’t need perfect prompts. You don’t need special language. Start messy. React to what it gives you. Say things like “more concrete,” “simpler,” or “that won’t work for my students.” Have a conversation like you would with a colleague.
Over time, your assistant gets better because you get clearer. That’s the laminator effect in action.
The power isn’t in building the assistant. It’s in returning to it.
Why This Matters
Nobody needs a generic chatbot. Teachers need tools that remember them.
When you build your own assistant, you’re laminating the parts of yourself that already work. Your routines. Your scaffolds. Your tone. Your values.
Instead of recreating the same directions, explanations, and supports over and over, you protect them. You make them durable. You start from 30 percent (or more!) instead of zero.
And when teachers stop starting from zero, they reclaim time, agency, and breath.
It’s not about efficiency. It’s about sustainability.
And that is how AI actually makes education better.
Reflection Questions
- Which part of your teaching currently drains you the most, and what would it feel like to have that part feel lighter?
- If you could “laminate” one instructional move, routine, or mindset so you never had to recreate it again, what would you preserve?
- Whose learning experience could improve the most if you had better support behind the scenes?
Note on AI Use:
I used ChatGPT to help me organize and refine my thoughts for this blog. I provided the ideas, notes, and direction, and the AI tool helped me pull it all together. I reviewed and edited everything to make sure it reflects my voice, stories and the message I want to share.
Share Post
Post Author
-

Stacy Kratochvil